Stay Up for the Summer Milky Way
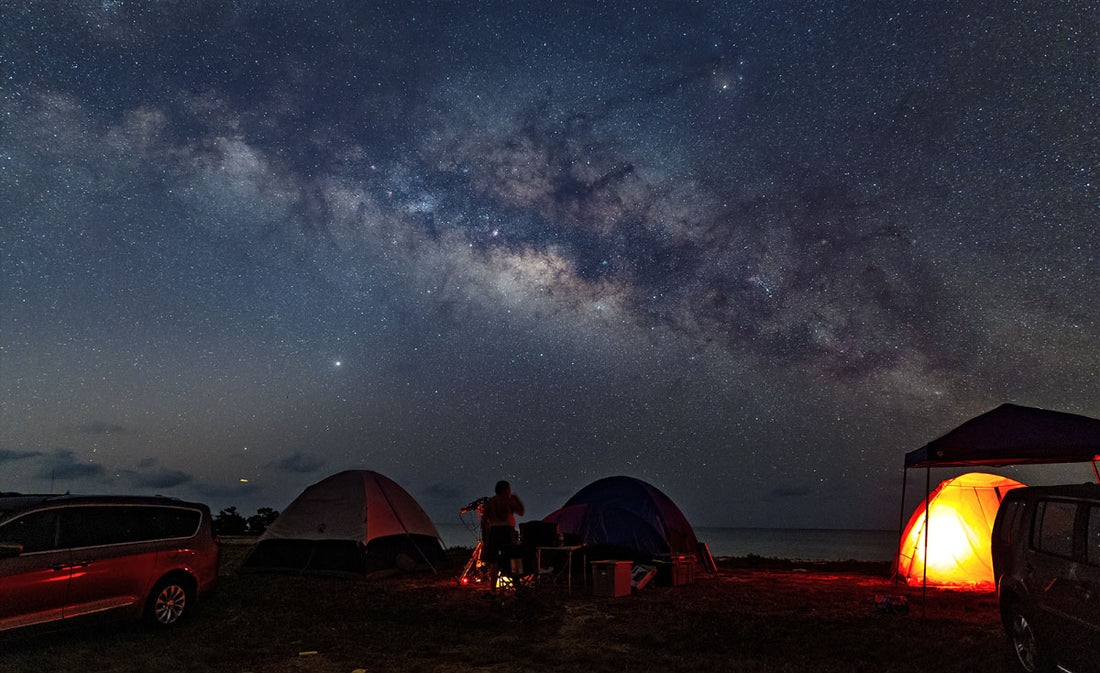
Summer is here, and while we are past the summer solstice it will be a while still before the days get noticeably shorter and it starts getting dark earlier. Where I live astronomical twilight doesn't come until after 9:30pm, and it's even worse for my friends who live further north. There is a treat though for those willing to stay up until “Dark O'clock”, and that is the return of the Milky Way. If you live in a suburban area, you may not be able to see the Milky Way, but summer is also a popular time for travel, and if your vacation adventures take you to where the skies are dark enough, the summer Milky Way is a treat you do not want to miss. It's also astonishingly easy to photograph!
It's funny that the spring “Galaxy Season” is considered over when the nearest galaxy of all, the one we live inside of, is now prominently overhead most of the night. This summer Milky Way is full of many of our favorite emission nebula targets, dark dusty lanes, and rich fields of dense stars. Naked eye at a very dark site, it appears like a hazy patch of approaching clouds as it rises in the east and stretches to the southern horizon. As it climbs though you'll see it has a light of its own, and with binoculars you'll see the billions of pinpoint pricks of light from a sea of stars that stretches for 100,000 light years. Impressive as it is visually, you really should point at camera at it, even if it's just your cell phone!
There are numerous apps for mobile phones that will take images in the dark by “stacking” many short exposures, and even handheld, a modern mobile phone can get the Milky Way from a dark site. This image was taken by a handheld iPhone at the 2023 Texas Star Party in west Texas for example. It's crude, and noisy but I just stopped along the road I was walking on, held up my phone and “snap” with the default camera app.

For better results you need a star tracker or a really fast lens on a tripod. Let's talk about the first option first. A star tracker is a simple platform that can easily be taken along on a trip in a small backpack. Like an equatorial mount, you align it to the pole, but it carries a smaller load than a telescope. Instead, they are designed to carry a simple DSLR or mirrorless camera and a widefield lens. Battery operated and light weight they will allow for exposures of a few minutes without any trailing of the stars in your image. These are ideal for very wide exposures of constellations or for capturing the Milky Way. Use a shutter release, or a self-timer so that there's no shake of the camera when the exposure starts. Some star trackers like the Sky-Watcher Star Adventurer shown here even have their own cable connection and will fire your camera for you!
Another option gets a bit pricier but wins hands down in terms of convenience. A fast camera lens can capture the Milky Way on a tripod, and you can keep the exposures short enough that the stars don't noticeably trail. My favorite way to shoot the Milky Way is with an f/1.4 widefield lens on my Canon EOS Ra mirrorless camera and a simple tripod. Typically, 8 seconds with my Sigma 20mm f/1.4 or Tamron 35mm f/1.4 is all the time I need.

Regardless of which approach you use, don't turn the ISO up too high, keep it reasonable at around ISO 800. Most digital cameras today are “ISO Invariant” which means ISO is just a convenience function that is more useful when you are shooting JPG. With a RAW exposure you can stretch and brighten the image up a bit more after you shoot, without risking oversaturating some of the brighter more colorful stars. Wait… I haven't already mentioned to ALWAYS shoot RAW and not JPG? You want that extra bit depth that comes with raw camera files (see my article on this topic in the upcoming October issue of Sky & Telescope for a more in-depth discussion of RAW vs. JPG).
The last challenge is getting a good focus. I have seen autofocus work on a really fast lens, but I would not count on it working for you. Put your lens on manual focus and find an area with a bright star or two. Use the zoom on your LCD to zoom in on the star and adjust focus to make the star as small as possible. Often, it seems you can move a bit back and forth and the star doesn't really get any smaller. How can you tell where the best focus is? Here's the next trick, watch carefully and a one point “suddenly” a handful of much fainter stars will appear and disappear while you are moving back and forth. That point where those fainter stars just show up is your best focus. Stop there and start shooting! Try and get the histogram readout if you have one just a little bit at least off the left-hand ledge and you'll have enough of an exposure to stretch and process later in your favorite photo editing software. Don't forget too, you can also take multiple exposures on your tripod or star tracker and stack them later to get a cleaner less noisy image!
If you can, I hope you can get away this summer, and get yourself some Milky Way!